Want to see BlurbBits in action? Visit our Sailing Blog or more examples.

2008-11-01

BlurbBits on Wordpress.com

Ok so I'm doing a little testing over on a BlurbBits Wordpress blog just to see what you can and can't do..

No Iframes so embedded BlurbBits are out, no javascript so there goes the auto generated BlurbBit popup maps.. I tried just cutting and pasting the Full embedded code just to see what would happen... The good news is the photo stays and the links all look good after they remove all of the Iframe for me (thanks)!! I also discovered that they also do something with absolute positioned elements, i.e. remove ALL style formating including the photo height and width (not nice)!! I have fixed the height and width issue, however a Wordpress.com user will need to remove the style attributes of the top BlurbBits div in order to get the tightest formating around the photo or you can just use the link options and add your own photos.

So here's what we can offer..

Interactive Examples:
&gfeed=http://blurbbits.wordpress.com/feed/atom/
A Blog map extracted for blurbbits.wordpress.com
&gfeed=http://blurbbits.wordpress.com/feed&bp=1
A Blog Album of blurbbits.wordpress.com
&gfeed=http://blurbbits.wordpress.com/feed&mv=where&mi=in
A Wordpress "where" map with link to latest Post
.. and an interactive Blog Navigation Map

No javascript or iframes is necessary on your site. We do the heavy lifting.

Check out our wordpress.com playground to see what we have done. We can add a selected photo and a link to the BlurbBits in the post but can't embed it or do any fancy Javascript GeoBlog Summaries and MORE!!

There are some issues to sort out prior to upgrading Wordpress.com to a defined status
  • Need some qualified testers who are willing to help test the functionality
  • Need to better understand the various photo uploading/blogging options.
    The basic single upload is simple to extract various sizes (thumbnail, full size etc).
  • Understand the requirements/process for approval as short codes. This is where BlurbBits would shine.
Need to find anyone who might be interested (contact us if you are).

And I can't believe how unbelievably slow it is .. In fact I'm writing all this while waiting for a WordPress Publish. It took almost two minutes to go from editing one post to editing another (1:53). Granted I don't have the fastest machine in the world but to save this edit and edit another post takes..23 seconds.. wow what a difference. I actually had to give up.. any menu click goes through the secure socket layer and takes forever. By the time I got to my post I had already forgotten what I was going to write about. I can't even figure out how to shut it off.. I tried all the suggestions but nothing seems to work!! oh Well.. glad I'm blogging here.

Update I did login later and found I wasn't in secure mode (must have been cookies or something).. it was faster.. but still slower than blogger.

Create a BlurbBit


BlurbBits can be used in a standalone mode to create a photo gallery, describe your travel route and/or detail a location. If you have a blog or feed based website, we can use the individual BlurbBits to extract an image and location into a summary Journal/Blog map or Photo Album AND the BlurbsViewr for an interactive navigation map of your site. If your blog doesn't support native geotagging, BlurbBits are really just a cool way of adding Map locations and zoom levels to each Blog Post or Web Page while giving you something for your efforts. See Extracting Data for more details of the data extraction process and options. Make sure you start with BlurbBits Basics if you haven't already.

Why do I have to enter a position?

Actually you don't. BlurbBits can easily be used without it, however a location adds a map and gives the end user a chance to see the area/areas you are describing. Since each location also includes a zoom level, you can configure all sorts of maps: one that shows the entire world to another that shows the details of your house, apartment or boat location. What about geocoding? Geocoding will get you a starting position, but only you the writer knows exactly where/what area you are taking about. Do you mean Boston proper or the area surrounding Boston?

llz=42.35892,-71.05781,9

llz=42.35892,-71.05781,15

With the BlurbBits Mapr it really doesn't take that long to pinpoint exactly what area you are talking about and then you can add photos etc. Note: The BlurbsViewr requires position data to place entries on the map.

BlurbBits allows you to put your article, blog entry or webpage "on the map" while managing your photos in one central utility.

Create a BlurbBit:

BlurbBits are configured via Url Parameters appended to the Url Path of our basic utilities and sent through a standard webpage HTTP request.

ex: http://..../blurbbits.html?blogger=svbillabong&mtitle=Sample

The query portion of the URI is used to define the key=value pairs. Each additional parameter is appended following an ampersand &, e.g.: ?key1=value1&key2=value2. The query string MUST begin with a ? (only one) or you will get "page cannot be found" errors. If there is a problem or missing portion of your BlurbBit, it is most likely in the parameter passing. These parameters can be added to the Location bar of your web browser or links you add to your page.

Interactive Examples:

The easiest way to get used to something new is to try it. The BlurbBits documentation will be organized as follows:

Feature Name: &Parameter=Options
  • Option: short description
    More details etc
Interactive Examples:
&llz=36.2938,30.1497,12&mi=in
Our Current Location (Try adding a title by add &mtitle=SVBillabong after in)
Clicking on the icon to the left of the text box will load the example into a BlurbBit in a popup window. If you expand the popup you'll see ../blurbbits.html?design=true&llz=36.2938,30.1497,12&mi=in in the Location Bar. We've automatically added the ?design=true but the rest is as entered above. The data gets passed to our WebSite so we can customize it especially for you, that's how the URL parameters work.

The example text is also available in an interactive text box that allows edits. Change the example and hit enter or click the icon and the changes will be loaded into the BlurbBit. If there are any issues you can always refer back to the original example above. The BlurbBit is in design mode so the publishing options will be available under the info (i) button. The &mtitle=Title option is used to title both the map and the webpage.

If you are anything like us, you'll skip the reference part and go straight to the examples, just make sure you understand any gotchas before you create too many BlurbBits.


Embedded BlurbBit in Blog Post

Interactive Example BlurbBit

Note: In certain cases the resulting interactive examples will appear slightly different in the popup than in an embedded version. In the embedded version you can designate a cover photo, which lives on the actual page it is embedded on and is not a part of the BlurbBit. As a result some of the interactive examples may appear "naked" since they are not embedded.

The examples all begin with the & sign for ease of entering into the BlurbBits Mapr. If you are entering these directly onto the URL path, make sure the first & is replaced with a question mark, i.e. http://www.creative-cruising.com/blurbbits.html?llz=36.2938,30.1497,12&mi=in.

Basic Setup & Publishing

BlurbBit title: &mtitle=Title
  • Title: used as the map caption AND page title.
    Special characters must be escaped i.e. use %20 for space
  • within the BlurbBits Mapr
    The Mapr handles escaping of special characters
    Uses the user defined label as the title if use label is selected
Interactive Examples:
&llz=36.2938,30.1497,14&mtitle=Our%20Current%20Location
Adds a title to our previous map


Width and Height: &width=Width and &height=Height
  • Width: Measured in Pixels ex: 400
  • Height: Measured in Pixels ex: 400
    do not enter
  • If you are hand editing the results make sure you update ALL the references
    These reference are passed to ensure correct reproduction in all the viewing options.
Interactive Examples:
&llz=36.2938,30.1497,14&width=220&height=200
A smaller version of our map (for Sidebar)


Design size considerations

The Design Size can effect photo load times dramatically. The default sizes were chosen to optimize the available photos, and the square shape supports both Horizontal and Vertical orientation. If only a map is used or the photos are in a single orientation, the width and height can be manually adjusted.

Publishing Options

If you are using the interactive examples, first make sure the width and height are correct for your application (sidebar vs post). &width=400&height=400 works for a Standard Post and &width=220&height=200 works for the Sidebar. These values can be added directly to the interactive examples box if you need to change the default sizes. Select the i (info) button for the publishing options (design mode must be enabled).


Blogger users have it easy..

Note: Jan 08. We are investigating a Blogger editor bug related specifically to Internet Explorer version 6.* while using the Compose editor with Iframes (like BlurbBits). We HIGHLY recommend you upgrade to a newer/safer/faster browser like Firefox. BlurbBits published via the Add Link publishing option will not break the compose editor and All BlurbBits will display correctly. The Edit Html editor reportedly works fine.
  • Choose the Blog This entry to add a new Post/Entry about your new BlurbBit. We even hide all the ugly HTML code for you, the [BLURBBIT] section is replaced with the actual code at publishing time.
  • Choose Add Gadget to add it as a gadget to the Blog (ie. Not a Post). By default the Gadget will appear in the sidebar. If you have configured the BlurbBit for a different location, drag the widget into place.
    Note as of Nov 7, dragging was broken in the Add gadget window. Open the layout panel in a new window and drag it there.
  • To add a BlurbBit to an existing post, edit the post, select the Edit Html tab and paste the Embed in Website/Blog Entry (with feed) code into the desired location. If you are having a hard time finding where to place the code, use compose mode to MARK the code, ie. add XXXX. Then use the browsers search to find it in Html mode.
Other Options
  • For direct links, email or IM paste the URL link into your editor.
  • For sites that allow Iframes AND have a RSS feed (like Blogger), choose the Embed in Website/Blog Entry (with feed) option. This will handle both the post/web page and include a link (and optional photo) into the feed so others will have access to the BlurbBit.
  • For sites that allow Iframes but don't have an RSS feed use the Embed in Website/Blog sidebar option.
  • For sites that do not allow Iframes, choose one of the link options.
In the Blurbbits Mapr use the X button in the upper right corner to close the preview window.

Design Mode: &design=Mode

For all the interactive examples and the BlurbBits Mapr, the design mode is enabled.

This triggers a development mode that allows you to choose publishing options and set default sizes based on where the BlurbBit will be used. It can be used in a sidebar, footer or embedded into a blog post or website, you can even email or IM it.
  • Mode: one of the set {sm,med,lrg,sidebar,footer,true}
    • sm: 250x250
    • med: 400x400
    • lrg: 500x500
    • sidebar: 220x220
    • footer: 600x200
    • true: triggers the mode but doesn't define size
    Allows access to publishing options and sets the BlurbBit size if not defined via &width and &height parameters
  • Within the BlurbBits Mapr
    The Mapr handles the setup and allows a quick preview of various size options.
  • The examples are all configured with design mode enabled
    Once a BlurbBit has been tested, it can be published via the options under the i info button.
Interactive Examples:
You'll be using design mode in all the interactive examples.

Now What?

2008-10-31

Picasa Album/Map Viewer

BlurbBits is great for viewing geotagged Picasa albums because it is focused around the photos not the map. We use Google static maps to add an overview map of your geotagged photos and an individual photo map for each photo.

With a single click the users can quickly see a map of the album location. A zoomed out view is also available, so the user can always answer where was that?.


You can also add an additional map, this one shows our 5 year Sailing trip. Clicking on the route map will load a detailed view showing our current location. Selecting the photo strip menu button will load our albums, add a geo photos map overview button to the main menu, and display the photo options menu. This menu allows you to toggle on/off various album overlays including captions, albums notes, and/or the location map (if it has a geotag). Change albums by selecting the thumbnail or using the next/previous buttons. The photos IN each album can be viewed by clicking the open album button. A popup will appear showing the selected albums location and its photos can be loaded and navigated the same way as albums. Once photos are loaded, the geo-photos button will appear in the main menu along with a map link (in the sidebar) for each photo, both a detailed photo location and overview map are available.

Picasa albums and photos can be organized/filtered by album or tags or general strings (title, tag).

Learn more about how to create your own

BlurbBits Mapr Help


The BlurbBit Mapr Utility has two uses:
  • Create & position multiple standalone BlurbBits
    including photo albums or sets (using extra parameters)
  • Extract & position existing content (from RSS feeds or scratchpad)
Standalone Blurbbits

Each marker or line creates a single BlurbBit which can then be added to a Blog Post, Website or the sidebar (see publishing options). Once this data has been entered it can be extracted and combined together to be displayed in its entirety using BlurbBits or BlurbsViewr. Basically we add BlurbBits to define each posts location (sort of like dropping bread crumbs) and then extract/collect them later if needed.

Existing Content

The extraction options can also be used with BlurbBits Mapr by adding them as Url Parameters (append them to the Mapr Url path starting with ?). Resulting objects can be used to create standalone BlurbBits (described above) and/or saved to the scratchpad and uploaded to the web using Google Spreadsheets. Use can use existing content to quickly build an interactive map of existing content, map existing blog posts, map Picasa web albums or extract existing lat/lng data from geotagged photos. Note: the scratchpad method does NOT modify original source data.

Some Basic Mapr Concepts
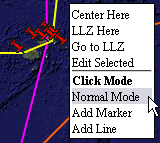
The setup map is designed around a right mouse click (RMC) context menu. In most cases this causes a menu to appear with various options based on the object and its current state.

A RMC on the map will allow you to configure the maps click mode (action of the left mouse button), change the maps center and adjust the map based on the LLZ (Lat,Long,Zoom) Locator. By default the click mode is in Normal Mode. You can also use the Edit Selected menu to edit the selected marker or line which is helpful when markers overlap.

LLZ Locator
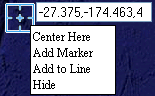
The LLZ (the blue box) is designed to be moved around to pinpoint a location and zoom level. Once the location is correct use RMC options to: add a new marker, add it to an existing line or center the map at its location. You can also move an existing marker to by using Marker RMC->Snap to LLZ. Note: You can alway re-center the LLZ at anytime by clicking the Move button next to the Center Lat,lng,Zoom field.

Marker
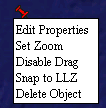
When the map is in Add Marker mode, a left mouse click will add the marker to the clicked location and store the maps current zoom level. A marker RMC menu has options to: edit properties, set zoom level, enable/disable drag (for positioning), snap to LLZ and delete object. Clicking on a marker at any time will re-center the map to its stored location and zoom level, the basis of the BlurbBit map. If the markers Drag Mode is enabled (default for new markers), the marker can be dragged to a new location with the left mouse.

Line
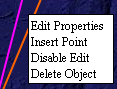
The line RMC menu has options to: edit properties, insert a point, disable edit mode and delete object. To add a line, first set the map to Add Line mode, then click the map to add points using a RMC to finish (or re-click the last point added). Editing a existing Line: A line can be re-shaped by moving the mouse over the line and dragging the segment end or mid point to a new position. A RMC on a segment end point will remove it from the line. Append points to the selected line by setting the map to Append to Line mode and clicking the map, a marker or the LLZ. The LLZ locator can be added to a selected line in any map mode (RMC->Add To Line).

Moving about the map

The map can be dragged with the left mouse or by using the pan controls on the top left. The map can be Zoomed by using the zoom scale on the left side, double clicking left mouse (zoom in), double click right mouse (zoom out), or by using the mouse scroll wheel (if it has one). Selecting a marker will center the map at its position and zoom level, while selecting a line will center the map to display it bounds.

Finding a Location
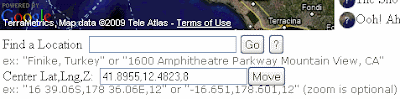

For all you landlubbers, enter the address, city and/or country you are trying to find in the location text box and click 'Go'. If the location cannot be found try refining the search string or starting at the Country, State or Region level. If found, the LLZ locator will move to the location and zoom level. Then you can modify the zoom, adjust the position and add it to a line or create a new marker. Please note that we all share this service and it is meant to only be used occasionally and certainly not for batch geo-coding. There are plenty of better and faster ways to batch geocode data (see batchgeocode.com/). See our examples on how to get lat/lng data from Wikipedia (good for tourist locations) or by extracting the data from geotagged photos (from a mobile device or automatic geotagging software).

If you are a sailor like us, you'll find lat/long values the easiest way to enter data. You can enter the comma separated lat,long (and optional zoom) values in either the Center Lat,Lng,Z text field or the LLZ text field.

Don't forget that markers also include a zoom value. Selecting a Marker on the map or in the select list will cause the map to center and zoom to the markers location and zoom level. An individual BlurbBit map will be centered at this view. You can use the Marker RMC Set Zoom to update the marker to the maps current zoom level (or enter it manually via the Edit Object - Zoom).

Designing a BlurbBit
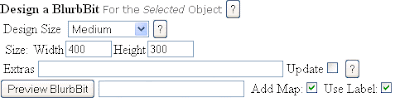

Choose your Design Size, configure your extras and then click the Preview BlurbBit button. This will popup a preview of the BlurbBit in a design mode. Once you have checked the various features and map zoom levels, select the Info button for the installation options. Use the X button in the upper right corner to close the preview window.

Choosing a Design Size

Note: The Design Size can effect photo load times dramatically. The default sizes were chosen to optimize the available photos, and the square shape supports both Horizontal and Vertical orientation. If only a map is used or the photos are in a single orientation, the width and height can be manually adjusted.

Extras

Markers and lines are really just the start, and we only talk about them first because we're talking about the BlurbBits Mapr so we figured you wanted a map. In the BlurbBits Mapr, extras cover the things that aren't described by the basic line or marker object. Extras can be extracted and entered much easier than drawing a line or figuring out the zoom level of the Boston area you are interested in without a map.

Hey what are all those funny ? and & signs I'm seeing?
Make sure you start with Create a BlurbBit
Extras can be used to configure the marker size and color, add photos, and various viewing/configuration options. These can be entered directly as a property of an Object (via BlurbBits property RMC->Edit Properties or the Scratchpad) or quickly entered directly into the Extras box. If an object has no prior BlurbBits definition it will be stored when the object is previewed. The next time the object is selected and previewed, the saved version is shown (good for double checking or storing and retrieving via the ScratchPad). The Update option enables you to quickly prototype different BlurbBits and will update the stored value from the Extras box.

Once you feel comfortable with the available options you can easily configure BlurbBits in the browsers Url Location window (use the design mode to get installation options).

More Details on Extra Options
Preview your BlurbBit

The Show Map button determines if the BlurbBit should include a map. This should be disabled for certain extras that automatically extract a map. The Use Label button allows the map title to be set to the Blurbs label.

Preview the configured BlurbBit and make sure you check each view. Once satisfied, choose your Publishing Option from the BlurbBit's preview i (info) menu. If you are not seeing the changes make sure you have the Update toggle set.

Line Properties
  • Color Name or #Ref (default is red)
    -Name: is one of the set {black, green, silver, lime, gray, olive, white, yellow, maroon, navy, red, blue, purple, teal, fuchsia, aqua}
    -#RGB: six digit hex triplet for RGB #ffff00 is yellow, #000000 is black,#ffffff is white
  • Width Width
    Width: Line width in Pixels (default is 2)
  • Opacity Num
    Num: Opacity value within range 0-1 where 1 solid, 0 invisible (default is 1)
Adding Routes/Paths to Locations

For geotagging, the most important item a BlurbBit can have is a Location (via llz ie. a Marker) but lines are great for showing your route or plans. We just don't know what you want to show: the start point, the end point or the center with a zoom that shows the entire route. The easiest way to show both is to use the Marker as your "master" and use a second line to draw the path.

Select the line and copy the path= section of the text box that appears besides the Preview BlurbBit button. Select the Marker, add a & with the path section you just copied into the extras box. If you've already stored a BlurbBit for the Marker, make sure you preview the old version first (which copies the stored value to the extras buffer), then add your line and set the Update toggle.

Most geotagged data will only have a single location, this method can be used to add paths to photo albums, sets and other marker. Don't forget to save the data with the ScratchPad for re-use, we don't extract data from the result path statements.

The ScratchPad


The scratchpad can be used to save the data you create/map; to re-used within the Mapr to adjust BlurbBits or to upload to the web for use with Google Spreadsheets (and extracted for utilites). It is also MUCH easier to cut/paste data into the ScratchPad than into dialog boxes one-by-one. Note: we don't store the data for you anywhere. Data loaded from the scratchpad with Load from ScratchPad replaces all existing Mapr data (changes will be lost).

Click the Save To Scratchpad button. Use the RMC-Select All in the scratchpad window to select and then RMC-Copy to copy all the text. Open a new text document with Notepad (or a simple text editor) and paste the text. Save the document. Use the | separated text file for quickly entering data in a text editor (like notepad) and tab separated for importing into text editor (like notepad), spreadsheets or table editors. Each line represents an object (objects cannot span multiple lines).

Using Google SpreadSheet (GSS)
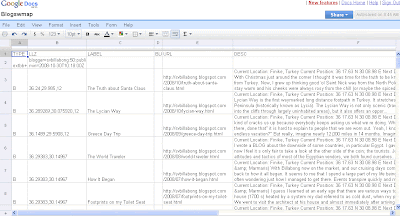


By uploading the data to a Google Spreadsheet you allow web access to the scratchpad data. You can then use the Google Spreadsheet extraction parameters to view your data in BlurbBits and utilities.
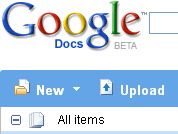
Login to Google Docs. Create a New Spreadsheet by selecting the New-Spreadsheet menu, this will open an Unamed Spreadsheet in a new window AND access the spreadsheet portion of Google Docs (you can also open an existing spreadsheet). Use the File-Import menu to upload the saved scratchpad text document from your computer. You can adjust the column widths to make it easier to read/modify data. Caution: If you just try to upload (instead of import) a plain text file (.txt) it will open incorrectly as a standard document. Tab separated text files (.tsv) will upload correctly as a spreadsheet.

Publish GSS
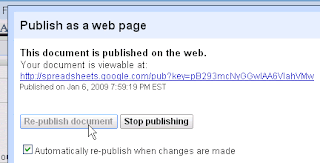
Use Share-Publish As Web Page and then Publish Now to share the data and allow BlurbBits web access to it. Check the "Automatically re-publish.." toggle to allow all changes to be passed to BlurbBits. Use the key=xxxyyyzzz value of the Your document is viewable at: link for the Google Spreadsheet extract parameter for BlurbBits or other utilities (ie. &gss=xxxyyyzzz).
Here's an example result in the Interactive Blog Map (new window) along with the Published Google Spreadsheet File.

If you want to make changes to THIS data with a new scratchpad file, use File-Upload New Version.. or edit the Google Spreadsheet manually. You can quickly copy rows from the scratchpad by copying and pasting into the spreadsheet using Ctrl-V. Note: if you are not familiar with Google Docs, please use the help that is available through their online support. We cannot provide help on end applications in addition to advancing the development of BlurbBits and related products.

Command Options:

You can also specify commands which combine BlurbBit extraction types. This is useful for combining historical Mapr data with new BlurbBits enhanced feeds.

Note these commands will not work within the ScratchPad but can be used in data passed into the Mapr.
  • bbext|extract-cmd: extract blurbs and add to list (in order)
  • bbext+|extract-cmd: extract and add to beginning of the list
  • sort|type: where type is the date sort format
    either blog (latest first) or journal (latest last).
Examples:

Add Paths to our Albums (see example file)
TYPE|LLZ|LABEL|BLURBBIT|URL|DESC|IMAGE|DATE|TRIP|EXTRA|LINEPTS
L||Route 2008||||||0|gray,2,1|7.78,98.3+7.62,92.61..
extbb+|picaalbums=SailBillabong


Combine blogs and photos and sorts them by date
extbb|picasa=SailBillabong::max-results=200
extbb|blogger=svbillabong:100
sort|blog

Add the latest blogs to our historically placed Mapr data AND routes (see example file)
extbb+|blogger=svbillabong:50:published-min=2008-10-30T10:18:00Z
B|36.24,29.985,12|The Truth ..|2008-Oct-30 09:18Z
B|36.289269,30.075920,12|The Lycian...


Note: Combining too many sources or extracting too many items from a single feed can dramatically slow down your load time. If you load a spreadsheet with commands into the mapr, the expanded results will appear.

ScratchPad Uses

You can also use this a simple format to start your BlurbBits when you are not online or create a quick travel log (sample file), objects do not need a llz. Create a couple of each object type and get a good understanding using the dialog boxes first. Then save them to the scratch pad and use this a template for future BlurbBits. Have a blast!! Note: if you have email access while offline it is much easier to Moblog.

Note: watch out for Microsoft Excel, it does some auto formatting of dates and numbers and sometimes it won't let you save the data back out into tab format (nice huh?). It is best to use the File->Open option which triggers the Text Import Wizard where you can configure each column type (general will auto-convert - text will NOT).

Scratchpad Column Details

Currently this format is designed specifically for saving to and from the ScratchPad and NOT for converting other data sources, unknown column headers will be ignored and deleted. Column headers must be formatted as shown (i.e. there is no mapping GUI). In the Google Spreadsheet empty rows cause problems. Columns can be any order however the TYPE statement must be the first column. Be careful when combining multiple data sets i.e. make sure the columns are in the same order.

Ex: (text | mode)
TYPE|LLZ|LABEL|BLURBBIT|URL|DESC|IMAGE|DATE|TRIP|EXTRA|LINEPTS
R|36.38591,30.12451,6|Sample-Marker|&picasa=SailBillabong
L|36.84535,30.25635,7|Sample-Line||||||0|red,2,1|35.74651,29.64111+37.31775,28.67432+37.9442,30.84961+36.35053,31.83838+36.31513,30.58594

TYPE: From the Set {R,J,B,A,P,V,K,L}

This is used to define the type of each blurb. In most cases this just changes the marker icon. In the future we will have a user defined set of types available but first we need to "roll it out" into the various utilities.
  • R: Location Report (general use)
  • J: Journal
  • B: Blog
  • A: Photo Album (Picasa Album, Flickr Set link of your own photo collection page.
  • P: Individual Photo
  • V: Video
  • K: KML/KMZ file Only used within BlurbsViewr and BlurbBits mapr.
    The specified KML Data should contain only line (<linestring>) or drawn data and not markers. Access to the KML marker information via the Google Maps API is non existent so any marker (and resulting info windows) will be outside the scope of our tool and will most likely confuse the end user. We are working on a KML extraction utility to get KML content into BlurbBits. In the mean time you can use the Mapr to roughly trace your complex KML lines (This example has both KML GPS tracks and simple lines). Contact Us to let us know it's important (and to give us feedback.. please). Tracing hint: because the KML layer clicks cannot be controlled, clicking on a KML line will cause an info window to appear. This makes it impossible to actually start drawing the line directly on the KML line. Start by clicking near the line and then trace, when finished drag the initial point onto the line.
    To access a Google My Maps KML File use the Url provided by the View in Google Earth button or change the &output=embed to &output=kml in your Google Map embed src= code. ex: http://www.google.com/maps..&output=kml.
  • L: A line/route/path or track. Best drawn via the BlurbsMapr utility. Use &rpoly=true to round values to two decimal places for the resulting BlurbBit (this reserves URL line length without effecting overall path description.. for large scale paths).
There is also a Trip mode that can be used to automatically generate Trip Tracking paths from your geotagged data. To enable use &tt=travel on either the BlurbsViewr or BlurbBits mapr. In the mapr the Travel Tracks will be updated each time the data is saved and reloaded via the ScratchPad. Please consider this a prototype feature as we have yet to add the definition capabilities to an individual BlurbBit.

X: add to the Travel Track Line (no tooltip or preview.. only position)
T: Starts a New Trip (uses the defined line definition and traces all subsequent points to build a path)
L+,L- more details to follow.. adds a drawn line to the Travel Track.

See a modern version of Billabong's Latest Wanderings. All the Travel Tracks (ie. lines) except the KML track were calculated using this method, which also calculates the travel distance.

LLZ: Lat,Lng,Zoom See Specifying a Location
We also support separate LAT,LNG,ZOOM colums which will be combined to create an LLZ column. (with LLZ the ,zoom value is option and will support Lat,Lng).

LABEL: The label (i.e title, caption) for this entry.

BLURBBIT: The pre-defined extra portion for this type.

Make sure you don't try and overwrite the main object parameters (llz, line pts etc), this is for the extra parameters only.

URL: Path,Label

Will be used to link to a webpage or specific blog in interactive modes (i.e. where do we go when a user clicks).
  • Path: The URL for a webpage
    ex: http://www.blurbbits.blogspot.com
  • Label: Optional Label will be used when building links (default is the label)
    ex: http://www.blurbbits.blogspot.com,this site
DESC: The content description for this entry.

Currently all HTML tags are stripped from this field (thanks hackers). We will be implementing a formating process as soon as we completely understand the issues and solutions.

IMAGE: ImgUrl,Caption

Will be used for the Image when referencing this entry.
  • ImgPath: The URL for an Image
    ex: http://www.blurbbits.blogspot.com/SomeImage
  • Caption: Optional caption will be used when building links to Image (default is the label)
    ex: http://www.blurbbits.blogspot.com/SomeImage,This Blog Image
Note: You must have rights to display and use the image. If you are creating these from scratch make sure you understand the rules of each data source.. i.e. Flickr requires a link back to the source photograph on Flickr.

DATE: YYYY-Mon-DD HH:MM or YYYY-MM-DD HH:MMZ

These are the only acceptable Date formats which are currently extracted from feeds and could be used in the future to sort by date for combining various data sources. Time should be specified in Greenwich Mean Time (GMT or Z) and is Optional. Note most cameras don't store time zone so GMT conversion is NOT critical, heck most people don't have the right year on their camera, let alone time.
  • YYYY-Mon-DD HH:MMZ
    Where Mon is from the set {Jan,Feb,Mar,Apr,May,Jun,Jul,Aug,Sep,Oct,Nov,Dec}
    Ex: 2004-Apr-18 06:43Z
  • YYYY-MM-DD HH:MMZ a T is optional between date and Time
    Ex: 2004-04-18 06:43Z or 2004-04-18T06:43Z
TRIP: AddTo

Will be used in the future to create Trip Tracks (need to extend definition to BlurbBits)
  • AddTo: from the set {" ",0,1,2}
    " ": space- Use map default
    0: don't include in Trip Track (use for separate "overview" content)
    1: Add to Trip Track (keep as blank for now)
    2: Add to Trip Route as Day Trip (out to location and then back)
EXTRA: Guess What? Here's where the Extra stuff goes.

Depending on the TYPE parameter different content is stored here.
  • L: Line style parameters color,width,opacity ex: red,2,1
  • K: KML/KMZ Url filename ex: http://www.creative-cruising.com/Billabong-Tracking/Billabongs-Sailing-Summary.kml
LINEPTS: The point defintions of a line + seperated.

It's easier to draw lines in the mapr.

Examples:

For a full example try loading our Blogger feed (?blogger=svbillabong) and then save the data to the ScratchPad. Draw some lines and store a couple of your own markers to get the full example and understanding of the data set.

Options Specific to BlurbsViewr:

tt:travel

Configures the Travel Tracker Display Mode, can also be configured via the URL parameter &tt=travel;


Flickr Photo/Map Viewer

BlurbBits is great for viewing geotagged flickr photos because it is focused around the photos not the map. We use Google static maps to add an overview map of your geotagged photos and an individual photo map for each photo.

With a single click the users can quickly see a map of the photos location. A zoomed out view is also available, so the user can always answer where was that?.


You can also add an additional map, this one shows our 5 year Sailing trip. Clicking on the route map will load a detailed view showing our current location. Selecting the photo strip menu button will load the photos from a set, add a geo photos map overview button to the main menu, and display the photo options menu. This menu allows you to toggle on/off various photo overlays including captions, photo notes, and/or the location map (if it has a geotag). Change photos by selecting the thumbnail or using the next/previous buttons.

flickr photos can be organized by set or filtered by tag and geotags.

Learn more about how to create your own, and play with some interactive examples.

Known Issues

There is an NEW bug in the underlying Google static maps that causes Blurbbits cross the dateline to appear incorrectly. This was just introduced in April. However we have been struggling for almost a year to provide workarounds (see issues 565 and 596.. ah the joys of APIs and putting Google in your critical path).

Special Characters

Be careful when using special characters for BlurbBits Mapr labels or the &mtitle= parameter. We will handle them correctly but some sharing sites have problems with ' in the title. If you add a ' it will appear in correctly in your BlurbBit title you might run into issues down the road.

We've recently noticed some strange characters that appear in various random feeds, possibly due to cut and paste of text into a document that wasn't expecting it. This can effect the ScratchPad. The ScratchPad does NOT have word wrap enabled so if you see any extra text at the beginning of the line make sure your append it to the previous line, move up on line, use the end key (or move to the end) and use the backspace button to remove extra characters. If you see R| or L| you've gone one too far. Hit Enter or use Ctrl-Z to undo.

Blogger

There are a couple of issues with Publishing Gadgets and Posts. The workarounds are listed, hopefully Blogger will fix them soon.

Copy and Paste. If a BlurbBit is published in a blog post, Blogger will convert all & to &amp; which causes problems if you are copying and pasting the BlurbBit from Blogger into a new blog post. Add &design=true to your blog post (republish and click info) and copy the result out of the i (info) button design mode popup results or paste the code into a text file first and replace all &amp; with & and paste the result into your new post.

Internet Explorer (IE) specific issues. For some reason IE strips the BEGIN/END BlurbBit comments while re-editing in compose mode. IE6 causes browser failure when switching to Compose editor mode with Iframes in the Blog spot (like BlurbBits).

BlurbBits Mapr

At some zoom levels the lines will disappear from the map. Google is working on a fix, the work around is to change zoom levels slightly. This should not effect the result in BlurbBits, it just makes it harder to find things. When editing a long line that crosses 180, sometimes the segment edit points won't appear (they are on the other side of the world). Zoom out and drag a segment end point closer to 180.

BlurbBits Maps

There is a known Static Maps API issue with lines that cross 0 degrees and 180 degrees (ie. go around the world). Break the line into two pieces at one of the above degrees. ie. Add a point at 0,0.001 and then another at 0,-0.001; Both paths can be added to the BlurbBits (as separate paths) and you won't see the difference. Occasionally a line will appear on a zoomed in location coming from the wrong direction. Adding a new line section point closer to the end location seems to fix the problem. Check out blogsmapr blog for some working(and broken) circumnavigation examples.

Remember to keep the number of points under 50 and don't try and add too much detail to your lines. If you are dealing with 0 or 180 crossings add a couple extra points near the crossing. You can imagine it's difficult to know what line you are talking about. Yes there are two points, but is it the short distance between the two, or the round the world distance you are trying to define. Breaking the path into shorter segments makes the path easier to define (for the Static Maps API).

Extracting Images

As you can imagine extracting the first photo (<img tag) can result in some interesting results if someone doesn't know you are looking for them. In the future we are planning some additions which will allow you to tag a photo as the one to extract. We are still trying to figure out a solution to avoid all the random images that sometimes appear (or are added by feed processing) in the feed (link icons, feed email links etc). The easiest thing is to come up with a standard photo you what to appear as your place holder (like a larger size favicon) and place it in your post before the unwanted photo. You can easily hide it by adding style="display:none" to the image tag.

Internet Explorer

If only browsers followed a standard our lives would be MUCH easier. IE removes comments when switching between Edit HTML and Compose mode. You'll only lose your start and end BlurbBit references but it is a pain.

There was an issue with Dynamic GeoBlog maps. Internet Explorer doesn't handle automatic addition of the GeoBlogs Map (it shifted sidebar items). We've changed the code to work around this issue.

IE 6.0 (what are you DOING using such an obsolete insecure and ridiculously slow browser?) causes a major problem with the Blogger Compose mode and is nearly unusable with interactive Google maps.

Firefox is a FREE standards compliant browser.. and It rocks!!

Firefox

Well we came up with our first Firefox specific Bug.. in certain situations Iframes (embedded BlurbBits) will swap src (ie. the wrong Iframe gets added). This is particularly noticable with the new Expandable posts and GeoBlog maps. Since the dynamic geoBlog map is the last Iframe to get added it sometimes gets the wrong src (Adsense, another BlurbBit etc). The fix is to reload the page if the GeoBlog map does not appear correctly. You can also use the new dynamic link to popup feature to avoid the issue (no Iframe).

2008-10-27

BlurbBits Basics


So what exactly is a BlurbBit or a Blurb for that matter?

Blurb
Noun
  • A short summary or a promotional description, as on a book jacket.
  • On the Internet a blurb is used to provide a brief description or promotion of a larger work.

A standard blurb refers to words or written text, but in todays connected world shouldn't we leverage the available resources to enhance our blurb? We've tweaked the definition slightly: an eBlurb (electronic blurb) is just a blurb with optional photos, maps, videos, and links added to improve its effectiveness. The best way to explain a BlurbBit is to show you an example.

Stand Alone BlurbBits

How would you describe a 5 year, 30,000 mile Sailing trip if you had one chance? Photos are the first thought (we have 25,000), a map of our current location, maybe even a map showing our route.

This is a BlurbBit of our Sailing Trip w/Current Location (details below).


We feel our trip is best summarized by showing our entire route (colored by year) with some of our favorite photo albums. Clicking on the route map will load a detailed view showing our current location. Selecting the photo strip menu button (top menu) will load the albums, add a geo photos map overview button to the main menu, and display the photo options menu. This menu allows you to toggle on/off various photo overlays including captions, album notes, and/or the location map (if it has a geotag). Change albums by selecting the thumbnail or using the next/previous buttons. The photos IN each album can be viewed by clicking the open link button. A popup will appear showing the selected albums location and its photos can be loaded and navigated the same way as albums. Once photos are loaded, the geo-photos button will appear in the main menu along with a map link (in the sidebar) for each photo, both a detailed photo location and overview map are available. Well if a photo is worth a thousand words.. what's a BlurbBit worth?

BlurbBits can be installed and viewed almost anywhere that supports javascript. You can email or IM the link, embedded it in your website or blog, or add it as a link in sites that don't support embedded objects. The photos were extracted from our Picasa online albums and can be filtered to easily build a "focused" BlurbBit for a specific Blog Entry or Webpage Journal (Flickr is also supported).

GeoBlogging

Now this gives a pretty good overview and might get people interested in reading more about our trip, but it would be a pain (for us) to update it every time we move. Plus it only shows the photos and the maps, what about the journals or blogs about each location? What if we could add a geotag to our blog posts (creating a GeoBlog), so we could use the same BlurbBits viewer? Well you can!! In fact a BlurbBit (with a location) is used to define the blog post location. The results can be used to extract the data for various views of your blog.

Update:
if you use Blogger, we also support the new geotagged posts in addition to our existing formats, check out our examples including dynamic in Blogger maps. We've also documented a travel blog process which shows you how to turn your existing blog into the ultimate Travel Blog complete with maps and photos.

BlurbBits extracted from Blogger (click link to open):
  • "Where?" Blog Map View
    Extracts the Blogs most recent defined location and includes a link to the latest blog post.
  • GeoBlog Tracking Map
    Tracks the Blogs N most recent locations, can be filtered by date and category/tag.
  • GeoBlog Album of From The Galley
    This example extracts the first photo (and optional location) from each Blog post to build a Blog Photo Album.. Huh? .. oh just try it!! Each blog post appears with its photo, the notes will give a brief blog summary and the map will show the blog location (if available).
  • BBlinkInteractive Site Navigation Map


    BlurbsViewr ScreenShot

    This is all of our Sailing trip content including SailBillabong.com (videos, journals, photos) and our latest blogs from svbillabong.blogspot.com. Our Sailbillabong data was hand entered but each Blog location is automatically mapped using the extracted Blog location data and photos. Double clicking on the map icon or selecting from the list (upper right) will zoom to the location and open the selected content in the window below. If Quick Links is disabled (Map Options->Quick Links) a Page summary/photo is available for preview. The Map is fully interactive, check out the online help for more details.
  • And.. here's the best part. BlurbBits that extract data (like above) are automatically updated, you don't have to touch a thing!! Add or update a BlurbBit Blog post and your friends will get to see your latest location, check out your latest blog AND track your trips progress, auto-magically!!
Remote GeoBlogging or MoBlogs:

If you are in a remote location that doesn't have direct internet access, you can use Mail-to-Blogger to define the Lat/Long location through the text format. Based on the History of BlurbBits, this one was of the most important features.

Update: we've added a post specifically on Mobile Blog and Photo support. We even have a post dedicated to remote Photo editing and organization in Picasa, for the times you have your computer but no internet connection.

Geo This, Geo That..

Wow entering all that geo-data seems like a lot of work. Defining the Blog Post location is the only extra work involved, the photos and photo/Blog location maps were automatically extracted from the Geotagged photos/blogs. Geotagging 25,000 photos is a lot of work, especially if you try and do it all at once. But BlurbBits doesn't need any of the information described above to function.

Do you:
  • Have photos in Picasa or Flickr?
    You can use it as a simple photo viewer, with or without geo-tagged photos!! Then you can enhance it with a map of location and/or your travel route.
  • Want to build a simple map? Try your house, your boat, your favorite places.
  • Have photos in your Blogger Blogs? Extract a Blog Album.
  • Have a general feed (geo tagged or not) that you want to put on an interactive navigation map? Extract it into the BlurbsViewr.

BlurbBits are designed to Grow

You can start with a simple email from the middle of the ocean, include your location, a small note about what's happening and we'll add it to your map (with Mail-To-Blogger you can even attach a small photo). Once you get re-connected to the internet you can upload your photos to Picasa or Flickr and add the photos you want to each BlurbBit (by album, pruned by tags, sets etc) while you update your blog with any additional notes or reflections. Then once you finally edit all your videos and compress them into something viewable, upload them to youTube and include them in your existing BlurbBits (coming soon).


Update: We've documented a complete Travel Blog process for Blogger. It can be used for other blogs that have RSS feeds however some of the commands may be slightly different.


You might have noticed we haven't mentioned login, upload to our site, load into our database etc. We have a hard enough time trying to keep track of our own 25,000 photos, let alone trying to manage yours. Blogger, Picasa, YouTube, Flickr and others all have 100's if not 1000's of engineers working to provide you the best and most up to date experience in their respective domains. We want to leverage that success and add to it, not compete with it.

We use existing data (extracted from RSS feeds) as much as possible, but we realize that some sites don't support feeds. In the future we are planing to add a database to allow searching and online storage but in the mean time there are plenty of things you can do to start preparing your data. Check out the BlurbBits Mapr help and look at the examples to get started.

Take your time and plan your content: think about how you will use albums, sets and/or tags/labels to divide your content. Tag/label your favorites and add a single tag to all your photos that is unique (like sailbillabong.com). Add captions and album notes. Start geo-tagging photos or keeping a location log for later use. The good news is you can always update the data later, and BlurbBits will automatically see the changes. Yes it may seem like work and it will take some time, but organization usually does. Once the photo data is available, you'll be able to use lots of very cool tools (including BlurbBits) to shuffle through it and slice and dice it into different views at will!!

Additional advantages

BlurbBits has some advantages over most traditional embedded photo viewers/maps and those users adding individual photos into each post. Even if you are "just" a simple blogger, you have entered the world of website design and the constant balance between performance and visual content. Surveys suggest that if your page doesn't load in 8 seconds, you'll lose up to a 1/3 of your visitors.. but photos, maps and gadgets all enhance the attractiveness of the site, so it's a fine balance. Some bloggers add as many gadgets, photos, and wizbang features they can think of, hoping to increase the chance that something will catch someones eye, but instead end up losing viewers who aren't willing to wait.
  • Embedded Maps
    BlurbBit maps use Google Static maps for speed while still allowing the user to zoom out/in to see another view and they can extract data from existing sources. The ability to combine maps with photos and travels routes makes it easy to add a single BlurbBit to a blog post or site. See the BlurbsViewr for interactive mapping options and a list of advantages over traditional interactive maps.
  • Embedded Photo Viewers
    BlurbBits are designed to load the photos only when the option is selected. This speeds up page loading and allows users to skip things they've already seen, without having to pay the performance penalty of reloading all the photos again and again every time they revisit your site (like a sidebar photo slideshow). A BlurbBit provides a single photo as a visual reference to both the blog viewer AND those viewing it through your feed. Most Embedded viewers or gadgets don't support feeds, in fact they are removed completely. If you take a look there is usually nothing in the spot where the slideshow or embedded map appeared on the original page. Check out our svbillabong.blogspot Feed to see how the BlurbBits appear!

  • Geotagged Photo Viewer
    BlurbBits is a one of the first geotagged photo viewers designed around the photo not the map. There are literally 100's of different ways you can view photos ON a map, but there are actually some people who don't like to use interactive maps (yeah crazy I know). They don't want to wait to load an interactive map only to get lost trying to find what they are looking for; the simple answer to "where was that?". BlurbBits allow you to add additional map information (route, track etc) to help enhance the photos that are about to be viewed.

  • Individual Photos
    Photos are great because they provide a quick visual reference to a subject mater in the text, but they are a pain to add to your blog. You have to format the text so it looks good around them, and re-add captions and notes you've probably already added in a photo editor somewhere. If you add too many photos, you'll slow down the page load.. AND .. you have to decide what size photo to display: too small and Grandma can't see them, too big and the blog text is harder to read. If you make changes to captions and notes (in the source data) you'll have to change them everywhere the photos are used. With BlurbBits, if you add/modify photos or change captions/notes, all the changes will appear in the BlurbBit automatically.

I like to have the BlurbBit near the top and add most of the text portion of the Blog Post below, after you've got the reader hooked. If you really need a visual reference for the text, try using a smaller version of the photo and highlighting the larger version in the BlurbBit.

There are other performance options that we'll describe in more detail later in a different blog , when we get a chance.

Group Emails for Journals

As you can imagine, we've met a lot of new people through our travels. An amazing number use group emails to communicate. What about the new friends you'll meet? How do they catch up on your travel history? Do you save and re-email old journals?

Get a blogger account and setup the Mail-to-Blogger option. Add the specified email address to your group email list and you are done. Your Blog will be an automatic archive of your emails AND you can even add a map and/or photos if you want. Now your new friends can "catch up" and your old friends have a place to go when they don't want to rifle through emails trying to find out where the heck you are.

Check out svbillabong.blogspot.com, most of those blogs were emailed from sea.

Update: We've add a Getting Started post to give you some pointers on where you could start.